There are different blogs available online which talk about how to get started with openvswitch but they don’t tell you much about the technicalities. They just give you a whole bunch of commands and somehow all of it works but if the scenario is changed a little then nothing works out. So here’s my attempt to clarify things a little more.
Here’s what I am trying to do :
- Install OpenVSwitch on my system.
- Create 2-3 Virtual Machines and connect them directly to the network which host is a part of. That means my VM will become part of the actual Network and can be reached by any system on my LAN.
UPDATE: I was not able to setup openvswitch using a Wireless Interface but wired interface works without any issues. So in the diagrams below I should use a wired interface, apart from that the whole tutorial will be same.
My existing setup:
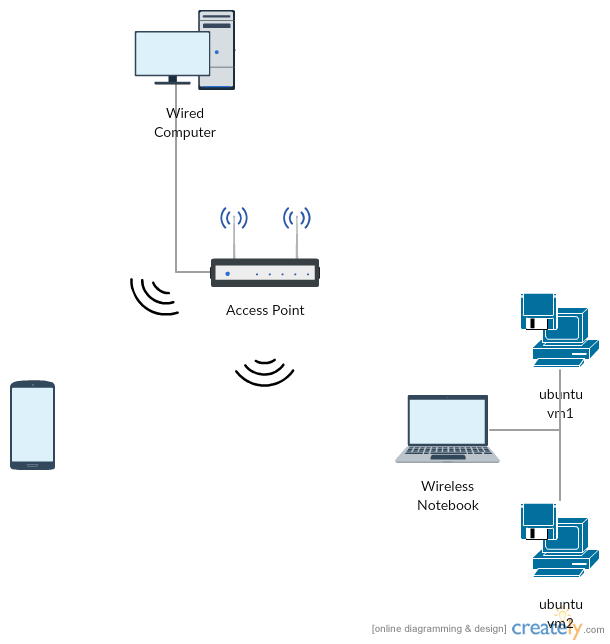
My system is connected to Wifi and my existing IP is 192.168.0.109 . My wifi supports DHCP. My mobile is also connected to same Wifi.
Final Expected Result.
Obtain a DHCP IP on my VM and reach to the apache server installed on the VM from my mobile. A setup similar to this
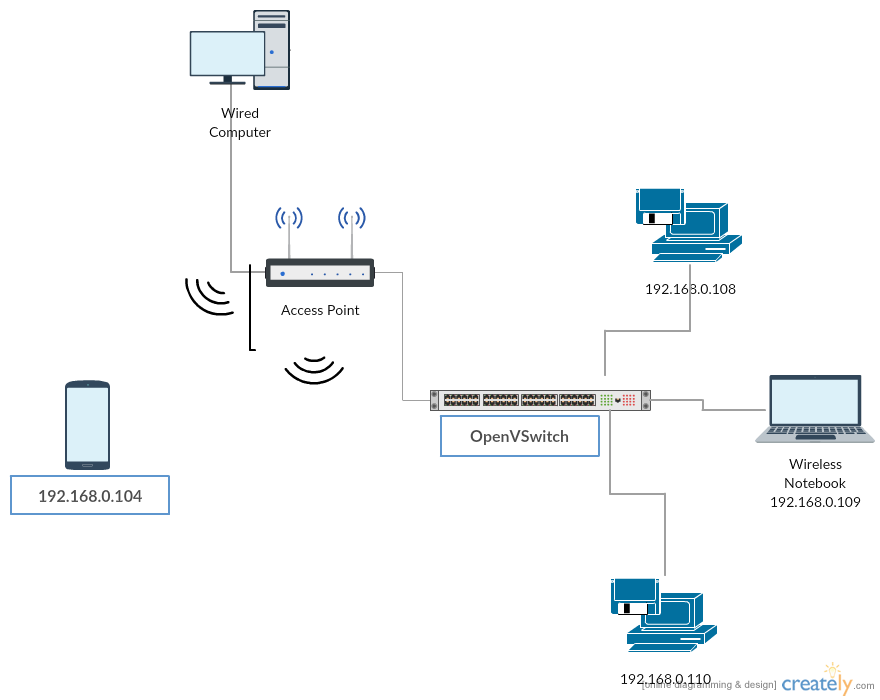
Here we have a virtual switch which is virutally connected to the access point and now even though both VMs are spawned on the Wireless Notebook, still to the network it appears as if they are independent machines.
I assume that you have virtual box installed already. Also keep ubuntu 14.04 or 16.04 server image ready. You can use the desktop image also, I’m recommending server image since its lite.
Step 1: Install OpenVSwitch
For Ubuntu Users:
sudo apt-get install openvswitch-switch
There are many other ways to install but this worked properly for me on ubuntu 16.04
Step 2: Create a bridge
Before typing in the commands I strongly recommend you guys to check out these videos. They explain very well what a bridge is. You will be able to understand how this solution works only if you understand bridging properly.
Once you are done watching that video, try the following command to create a bridge:
ovs-vsctl add-br br0
This will create a bridge interface which will be used by OVS.
Step 3: Create a tap interface
First of all what’s a TAP Interface?
I strongly recommend going through this blog Virutal Networking : Linux Bridge, it explains what is a TAP interface and why we actually need it. It also explains how virtual network can be created using bridging and virtual interfaces.
In simple words:
Tap interfaces are special software entities which tell the Linux bridge to forward Ethernet frames as it is.
sudo ip tuntap add mode tap vikas0
// This will create a TAP interface with name vikas0
sudo ifconfig vikas0 up
// Turns up the interface which we just created
ovs-vsctl add-port br0 wlp3s0
// This connects wlp3s0 interface to our OVS.
// Replace wlp3s0 with your interface name. It’s the interface which // is used by your host machine to connect to Internet.
sudo ovs-vsctl add-port br0 vikas0
// Connects tap port to the ovs switch
ifconfig wlp3s0
// Gives info about wlp3s0 interface
Link encap:Ethernet HWaddr 48:45:20:a7:6b:0b
inet addr:192.168.0.109 Bcast:192.168.0.255 Mask:255.255.255.0
inet6 addr: fe80::4a45:20ff:fea7:6b0b/64 Scope:Link
UP BROADCAST RUNNING MULTICAST MTU:1500 Metric:1
RX packets:108594 errors:0 dropped:125 overruns:0 frame:0
TX packets:70652 errors:0 dropped:0 overruns:0 carrier:0
collisions:0 txqueuelen:1
RX bytes:171247444 (171.2 MB) TX bytes:10269494 (10.2 MB)
Save the inet address and netmask somewhere, you will need it later.
route -n | grep UG | awk ‘{split($0, a, ” “); print a[2]}’
// This will give you your gateway IP. Store it somewhere because //we will need it later.
sudo ifconfig wlp3s0 0
// Removes ip from wlp3s0 interface
ifconfig br0 192.168.0.109 netmask 255.255.255.0
// Assigns the IP to br0 interface which was earlier assigned to wlp3s0 interface. Use the IP and netmask of wlp3s0 interface which we saved before. Please note that this step is important otherwise you will loose connectivity. The br0 interface gets the same MAC address as your wlp3s0 interface. That’s why it is important to assign it the same IP address to make sure that you don’t loose internet connectivity (If you are on a MAC filtered network).
route add default gw 192.168.0.1 br0
// Replace 192.168.0.1 with your gateway IP which you obtained earlier.
Step 4: Create a VM Using Virtual Box
Follow this link:
http://askubuntu.com/questions/142549/how-to-install-ubuntu-on-virtualbox
Step 5: Setup bridging on VM
Shut down your VM after installation is done. Open VM Settings.
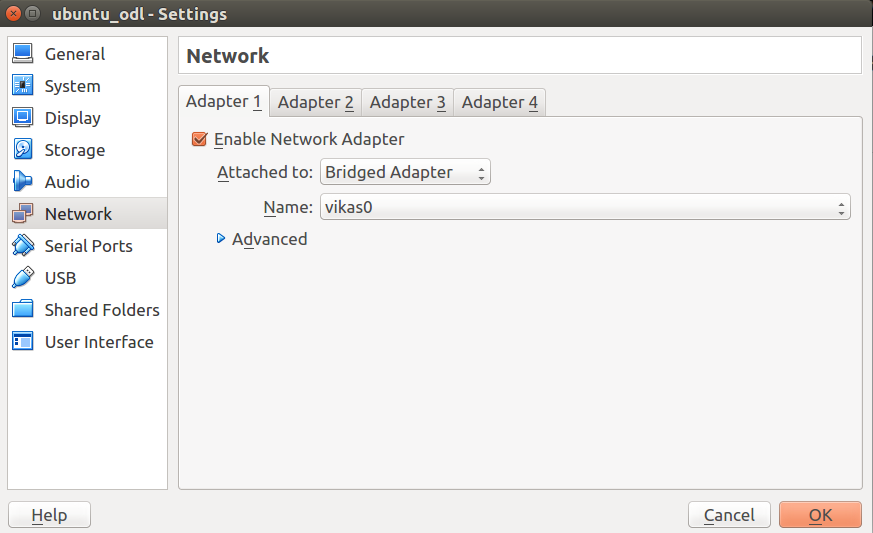
UPDATE: If you used a wireless interface with openvswitch then your VM won’t obtain the IP.
And you are done. Hope it helps
UPDATE 2: If you try this out on a wireless interface then you might loose connectivity after you try reconnecting to Wifi. To fix that type in the following:
sudo ovs-vsctl del-port br0 wlan0
sudo ifconfig wlan0
Replace wlan0 with your wifi interface name.