Amahi Installation Instructions
If you are planning to work on amahi and want to get it set up in a production like environment then this guide might be helpful.
I tried setting up Amahi using both VirtualBox and VMware and turns out vmware was much better and I’ll explain it why.
Amahi Server will need a fixed IP address to run. Plus that IP address should be reachable from your host. Simple networking options
in VirtualBox or Vmware player give you following two options:
- Nat Mode
- Bridge Mode
Why use NAT mode?
First of all you have to understand why we need to use NAT mode. In NAT mode your VM will be assigned a fixed IP. That means even
if you move across networks you don’t have to bother about changing IP which happens in Bridge Mode.
NAT mode in Virtualbox
There is one major problem or maybe a feature of NAT mode in Virtualbox:
It assigns your VM ip in some range like 10.0.0.1/24. You will have internet connectivity on your VM but you can’t ping your VM
from outside.
For example your host machine has IP address `192.168.0.2` and your VM has IP addres `10.0.0.10`. You cannot ping 10.0.0.10 from
your host machine. Maybe we can write some iptable rules to make this work but I didn’t explore that because VMWare was just too easy.
NAT mode in VMWare
Whatever IP address is assigned to your VM in NAT mode, it can be pinged from your host machine and that solves your problem.
Now since we are through the basics, let’s get started to setting up Amahi Server.
First of all do a fresh installation of Fedora 25 on VMWare by taking help of instructions given on amahi website. While creating the VM pick NAT Mode for networking. Picking up NAT mode is simple but still I have this video which might help you in case if you are confused.
Once fedora installation is done, open terminal inside the VM and type in
ifconfig : This will give you IP address of your VM
route -n : This will give you gateway IP.

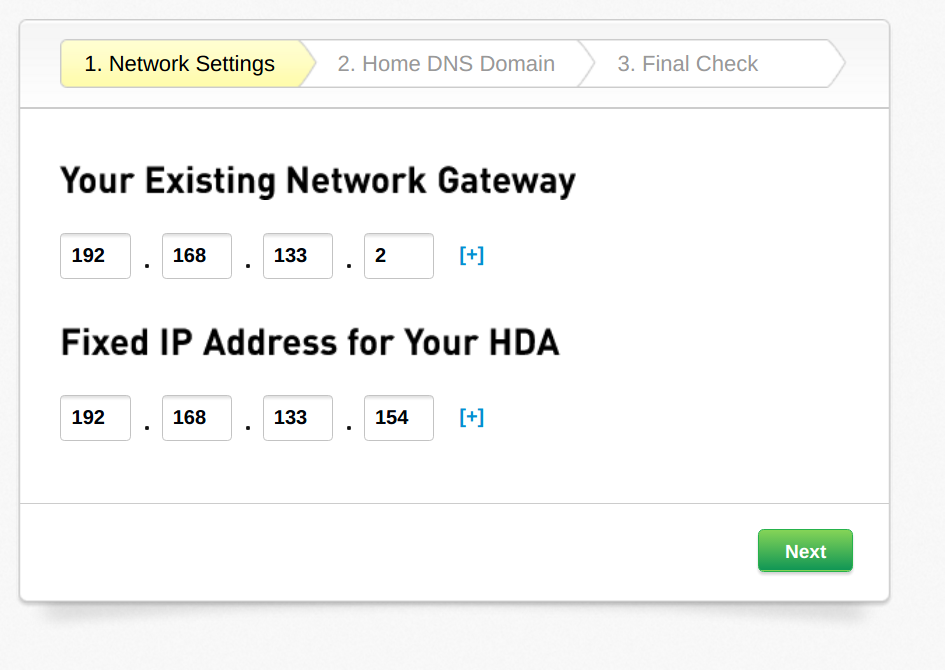
You can see here my VM IP is 192.168.133.154
Gateway IP is 192.168.133.2
Once you have the the VM IP and Gateway IP you can proceed with the installation. Go to amahi website and create a new profile using the above data.
You can get the install code after this and continue with your installation.
sudo su –
rpm -Uvh http://f25.amahi.org/noarch/hda-release-6.9.0-1.noarch.rpm
dnf -y install hda-ctl
hda-install YOUR-INSTALL-CODE
192.168.133.154 progress.amahi.net
192.168.133.154 hda.amahi.net
192.168.133.154 dokuwiki.amahi.net
192.168.133.154 owncloud10.amahi.net
192.168.133.154 maps.amahi.net
192.168.133.154 phpmyadmin.amahi.net
192.168.133.154 hda
192.168.168.128 gallery2.amahi.net
Or you can modify your /etc/resolv.conf file to look something like this:
nameserver 127.0.0.1
nameserver 192.168.133.154
search amahi.net
Now everything should work for you without any issues. 🙂
Pingback: GSoC Blog : First 10 days. | Tech and me.